> ## Documentation Index
> Fetch the complete documentation index at: https://continue-docs.mintlify.site/llms.txt
> Use this file to discover all available pages before exploring further.
# How to Create and Manage Rules in Continue
> Rules are used to provide system message instructions to the model for Agent mode, Chat mode, and Edit mode requests
Rules provide instructions to the model for [Agent mode](../../ide-extensions/agent/quick-start), [Chat](../../ide-extensions/chat/quick-start), and [Edit](../../ide-extensions/edit/quick-start) requests.
Rules are not included in [autocomplete](./autocomplete) or
[apply](../model-roles/apply).
## How Rules Work in Continue
You can view the current rules by clicking the pen icon above the main toolbar:
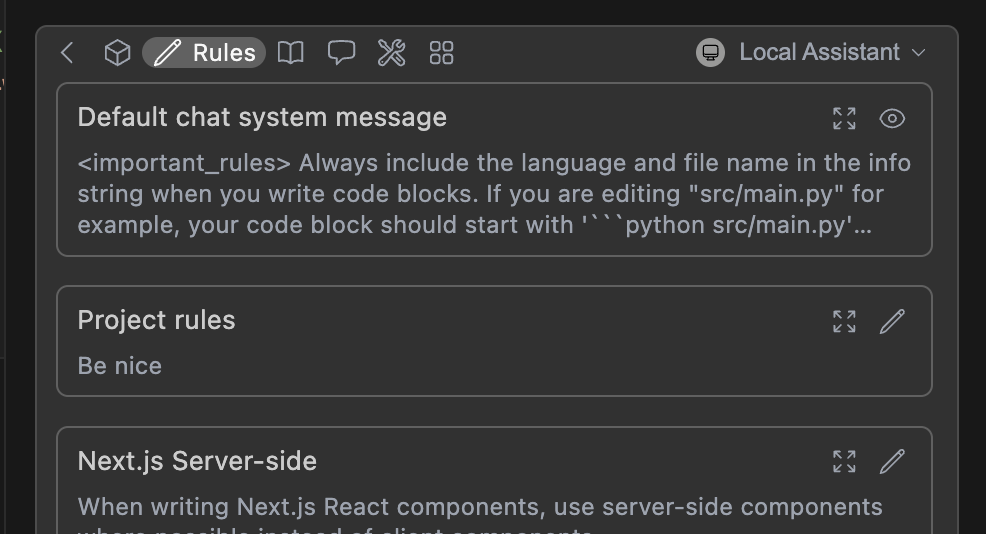 To form the system message, rules are joined with new lines, in the order they appear in the toolbar. This includes the base chat system message ([see below](#how-to-customize-chat-system-message)).
## Quick Start: How to Create Your First Rule File
Below is a quick example of setting up a new rule file:
1. Create a folder called `.continue/rules` at the top level of your workspace
2. Add a file called `pirates-rule.md` to this folder.
3. Write the following contents to `pirates-rule.md` and save.
```md title=".continue/rules/pirates-rule.md" theme={null}
---
name: Pirate rule
---
- Talk like a pirate.
```
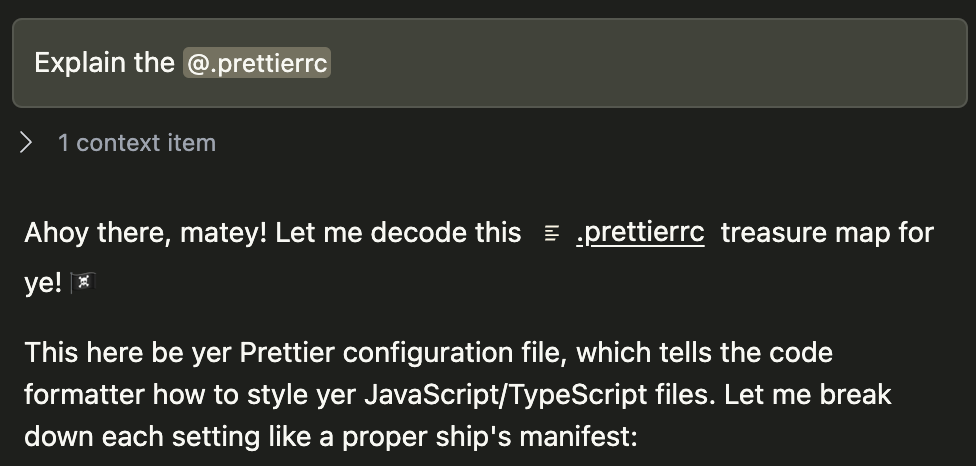
Now test your rules by asking a question about a file in chat.
To form the system message, rules are joined with new lines, in the order they appear in the toolbar. This includes the base chat system message ([see below](#how-to-customize-chat-system-message)).
## Quick Start: How to Create Your First Rule File
Below is a quick example of setting up a new rule file:
1. Create a folder called `.continue/rules` at the top level of your workspace
2. Add a file called `pirates-rule.md` to this folder.
3. Write the following contents to `pirates-rule.md` and save.
```md title=".continue/rules/pirates-rule.md" theme={null}
---
name: Pirate rule
---
- Talk like a pirate.
```
Now test your rules by asking a question about a file in chat.
 ## How to Create Rules
### Creating Local Rules
Rules can be added locally using the "Add Rules" button.
## How to Create Rules
### Creating Local Rules
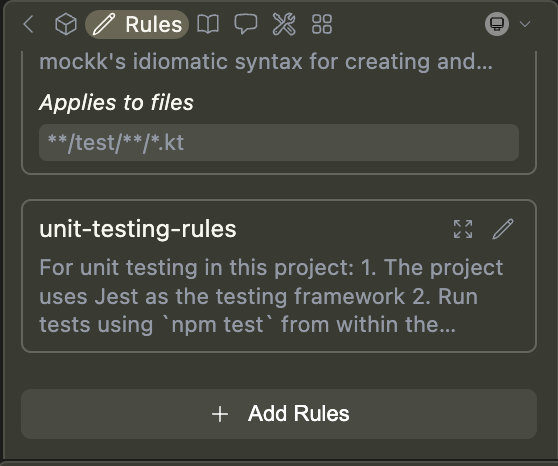
Rules can be added locally using the "Add Rules" button.
 **Automatically create local rules**: When in Agent mode, you can prompt the agent to create a rule for you using the `create_rule_block` tool if enabled.
For example, you can say "Create a rule for this", and a rule will be created for you in `.continue/rules` based on your conversation.
### How to Configure Rule Properties and Syntax
Rules were originally defined in YAML format (demonstrated below), but we
introduced Markdown for easier editing. While both are still supported, we
recommend Markdown.
Rules can be simple text, written in YAML configuration files, or as Markdown (`.md`) files. They can have the following properties:
* `name` (**required** for YAML): A display name/title for the rule
* `globs` (optional): When files are provided as context that match this glob pattern, the rule will be included. This can be either a single pattern (e.g., `"**/*.{ts,tsx}"`) or an array of patterns (e.g., `["src/**/*.ts", "tests/**/*.ts"]`).
* `regex` (optional): When files are provided as context and their content matches this regex pattern, the rule will be included. This can be either a single pattern (e.g., `"^import .* from '.*';$"`) or an array of patterns (e.g., `["^import .* from '.*';$", "^export .* from '.*';$"]`).
* `description` (optional): A description for the rule. Agents may read this description when `alwaysApply` is false to determine whether the rule should be pulled into context.
* `alwaysApply`: Determines whether the rule is always included. Behavior is described below:
* `true`: Always included, regardless of file context
* `false`: Included if globs exist AND match file context, or the agent decides to pull the rule into context based on its description
* `undefined` (default behavior): Included if no globs exist OR globs exist and match
```md title="doc-standards.md" theme={null}
---
name: Documentation Standards
globs: docs/**/*.{md,mdx}
alwaysApply: false
description: Standards for writing and maintaining Continue Docs
---
# Continue Docs Standards
- Follow Mintlify documentation standards
- Include YAML frontmatter with title, description, and keywords
- Use consistent heading hierarchy starting with h2 (##)
- Include relevant Admonition components for tips, warnings, and info
- Use descriptive alt text for images
- Include cross-references to related documentation
- Reference other docs with relative paths
- Keep paragraphs concise and scannable
- Use code blocks with appropriate language tags
```
```yaml title="doc-standards.yaml" theme={null}
name: Documentation Standards
version: 1.0.0
schema: v1
rules:
- name: Documentation Standards
globs: docs/**/*.{md,mdx}
alwaysApply: false
rule: >
- Follow Mintlify documentation standards
- Include YAML frontmatter with title, description, and keywords
- Use consistent heading hierarchy starting with h2 (##)
- Include relevant Admonition components for tips, warnings, and info
- Use descriptive alt text for images
- Include cross-references to related documentation
- Reference other docs with relative paths
- Keep paragraphs concise and scannable
- Use code blocks with appropriate language tags
```
### How to Set Up Project-Specific Rules
You can create project-specific rules by adding a `.continue/rules` folder to the root of your project and adding new rule files.
Rules files are loaded in lexicographical order, so you can prefix them with numbers to control the order in which they are applied. For example: `01-general.md`, `02-frontend.md`, `03-backend.md`.
### Example: How to Create TypeScript-Specific Rules
```md title=".continue/rules/typescript.md" theme={null}
---
name: TypeScript Best Practices
globs: ["**/*.ts", "**/*.tsx"]
---
# TypeScript Rules
- Always use TypeScript interfaces for object shapes
- Use type aliases sparingly, prefer interfaces
- Include proper JSDoc comments for public APIs
- Use strict null checks
- Prefer readonly arrays and properties where possible
- modularize components into smaller, reusable pieces
```
## Troubleshooting Rules
### Issue: Rules Don't Appear in Assistant
**Problem**: Your rules exist but don't show up in the rules toolbar.
**Check These**:
1. **File location**: Ensure rules are in `.continue/rules/` (not `.continue/rule/`)
2. **File format**: Rules should be `.md` files with proper YAML frontmatter
### How to Customize Chat System Message
Continue includes a simple default system message for [Agent mode](../../ide-extensions/agent/quick-start) and [Chat](../../ide-extensions/chat/quick-start) requests, to help the model provide reliable codeblock formats in its output.
This can be viewed in the rules section of the toolbar (see above), or in the source code [here](https://github.com/continuedev/continue/blob/main/core/llm/constructMessages.ts#L4).
Advanced users can override this system message for a specific model if needed by using `chatOptions.baseSystemMessage`. See the [`config.yaml` reference](/reference#models).
**Automatically create local rules**: When in Agent mode, you can prompt the agent to create a rule for you using the `create_rule_block` tool if enabled.
For example, you can say "Create a rule for this", and a rule will be created for you in `.continue/rules` based on your conversation.
### How to Configure Rule Properties and Syntax
Rules were originally defined in YAML format (demonstrated below), but we
introduced Markdown for easier editing. While both are still supported, we
recommend Markdown.
Rules can be simple text, written in YAML configuration files, or as Markdown (`.md`) files. They can have the following properties:
* `name` (**required** for YAML): A display name/title for the rule
* `globs` (optional): When files are provided as context that match this glob pattern, the rule will be included. This can be either a single pattern (e.g., `"**/*.{ts,tsx}"`) or an array of patterns (e.g., `["src/**/*.ts", "tests/**/*.ts"]`).
* `regex` (optional): When files are provided as context and their content matches this regex pattern, the rule will be included. This can be either a single pattern (e.g., `"^import .* from '.*';$"`) or an array of patterns (e.g., `["^import .* from '.*';$", "^export .* from '.*';$"]`).
* `description` (optional): A description for the rule. Agents may read this description when `alwaysApply` is false to determine whether the rule should be pulled into context.
* `alwaysApply`: Determines whether the rule is always included. Behavior is described below:
* `true`: Always included, regardless of file context
* `false`: Included if globs exist AND match file context, or the agent decides to pull the rule into context based on its description
* `undefined` (default behavior): Included if no globs exist OR globs exist and match
```md title="doc-standards.md" theme={null}
---
name: Documentation Standards
globs: docs/**/*.{md,mdx}
alwaysApply: false
description: Standards for writing and maintaining Continue Docs
---
# Continue Docs Standards
- Follow Mintlify documentation standards
- Include YAML frontmatter with title, description, and keywords
- Use consistent heading hierarchy starting with h2 (##)
- Include relevant Admonition components for tips, warnings, and info
- Use descriptive alt text for images
- Include cross-references to related documentation
- Reference other docs with relative paths
- Keep paragraphs concise and scannable
- Use code blocks with appropriate language tags
```
```yaml title="doc-standards.yaml" theme={null}
name: Documentation Standards
version: 1.0.0
schema: v1
rules:
- name: Documentation Standards
globs: docs/**/*.{md,mdx}
alwaysApply: false
rule: >
- Follow Mintlify documentation standards
- Include YAML frontmatter with title, description, and keywords
- Use consistent heading hierarchy starting with h2 (##)
- Include relevant Admonition components for tips, warnings, and info
- Use descriptive alt text for images
- Include cross-references to related documentation
- Reference other docs with relative paths
- Keep paragraphs concise and scannable
- Use code blocks with appropriate language tags
```
### How to Set Up Project-Specific Rules
You can create project-specific rules by adding a `.continue/rules` folder to the root of your project and adding new rule files.
Rules files are loaded in lexicographical order, so you can prefix them with numbers to control the order in which they are applied. For example: `01-general.md`, `02-frontend.md`, `03-backend.md`.
### Example: How to Create TypeScript-Specific Rules
```md title=".continue/rules/typescript.md" theme={null}
---
name: TypeScript Best Practices
globs: ["**/*.ts", "**/*.tsx"]
---
# TypeScript Rules
- Always use TypeScript interfaces for object shapes
- Use type aliases sparingly, prefer interfaces
- Include proper JSDoc comments for public APIs
- Use strict null checks
- Prefer readonly arrays and properties where possible
- modularize components into smaller, reusable pieces
```
## Troubleshooting Rules
### Issue: Rules Don't Appear in Assistant
**Problem**: Your rules exist but don't show up in the rules toolbar.
**Check These**:
1. **File location**: Ensure rules are in `.continue/rules/` (not `.continue/rule/`)
2. **File format**: Rules should be `.md` files with proper YAML frontmatter
### How to Customize Chat System Message
Continue includes a simple default system message for [Agent mode](../../ide-extensions/agent/quick-start) and [Chat](../../ide-extensions/chat/quick-start) requests, to help the model provide reliable codeblock formats in its output.
This can be viewed in the rules section of the toolbar (see above), or in the source code [here](https://github.com/continuedev/continue/blob/main/core/llm/constructMessages.ts#L4).
Advanced users can override this system message for a specific model if needed by using `chatOptions.baseSystemMessage`. See the [`config.yaml` reference](/reference#models).